
dress-up disco (buttons and sliders for ICM)
- moawling
- Sep 30, 2020
- 4 min read
For our Week 3 assignment, we were instructed to make a collaborative p5js sketch that included the following:
Make a rollover, a button, or a slider from scratch.
Create an algorithmic design with simple parameters. Make your interface element control the appearance or behavior of the algorithmic design.
I was paired with Eric Kalb, and together we made a little dress-up disco game! You can check it out here! https://editor.p5js.org/mnk2970/sketches/xLvYxDhFP

image description: A screenshot of our assignment. All of the assets shown are rendered in pixel art. In the foreground are two floating articles of clothing, a shirt and a pair of pants. The shirt is a brown plaid flannel shirt and the bottom shirt is a pair of white swim trunks with a funky teal 80s scribble print. To the left and right of each article of clothing are arrows, which are intended to cycle through the different clothing options. In the top right corner is a sparkling disco ball. The background of the game is a stage, with theatrical red curtains and a spotlight.
Eric came up with the idea of making a dress-up game! Over the course of our first meeting over Zoom, we designated separate tasks for the assignment. I assumed the tasks of rendering the assets in pixel art and coding the arrow buttons. Eric picked various clothes to be featured in our game and volunteered to code a special animation when the disco ball was clicked.
After rendering all of the various pixel art assets in FireAlpaca, I uploaded them to my p5js editor (I just want to show them off a little bit, i think i did GREAT).

image description: A compilation of various pixel art assets for our project. The stage and curtain background image is featured to the left. On the left side of this image are the smaller, more interactive assets, which include the interactive arrow buttons and a disco ball. Underneath these assets are several articles of clothing. The clothing articles are an 'I <3 NY' T-shirt, a Hawaiian themed shirt, and a plaid flannel shirt.
I knew that I wanted the side buttons to scroll through the three options for shirts and bottoms. To do so, I had to set up the following through code:
• Create an array for my clothing assets
• Set up a function which would take the direction of the arrow to influence the value of each clothing
• Create a conditional statement inside of the function to return the new shirt value
• Return the shirt value to a function that displayed the clothing
VERY COOL! Very NICE!
for my first step "Create an array for my clothing assets", I declared my variables at the top (comments are in blue):
//this is to set up our clickable assets (buttons and sliders)
let left_top_arrow
let right_top_arrow
let right_top_click
let left_bottom_arrow
let right_bottom_arrow
let shirts
let shirt1
let shirt2
let shirt3
let bottoms
let bottom1
let bottom2
let bottom3
Right underneath, I also declared a value for 'current_shirt' and 'current_bottom', which are variables I would use to determine the value of the displayed article of clothing. I chose '1' as my value to display the 'middle' clothing option between my three clothing options.
current_shirt = 1;
current_bottom = 1;
The 'shirts' and the 'bottoms' variables that I declared earlier were then used to establish my arrays, which would assign a value from 0 to 2!
  // create an array of shirts and bottoms
shirts = [shirt1, shirt2, shirt3];
bottoms = [bottom1, bottom2, bottom3];
Underneath all of this, I loaded all of my images in a preload function!
//this is our image library
function preload() {
   left_top_arrow = loadImage ('assets/arrowleft.png');
    left_top_arrow_click = loadImage ('assets/arrowleft_clicked.png');
    right_top_arrow = loadImage ('assets/arrowright.png');
    right_top_arrow_click = loadImage ('assets/arrowright_clicked.png');
    left_bottom_arrow = loadImage ('assets/arrowleftbottom.png');
    left_bottom_arrow_click = loadImage ('assets/arrowleftbottom_clicked.png');
    right_bottom_arrow = loadImage ...
To test this out, I tried to load the image in my draw function. Unfortunately, when I tried it out, it wasn't working!
//this is to load our shirts and bottoms (hopefully)
  image(shirts[current_shirt], 96, 48)
  disco()

  image(bottoms[current_bottom], 96, 240)
  disco()
I later met up with John Bezark, who was offering help as a part of ITP's coding lab! He pointed out that the order of the functions that I established didn't allow for the images to 'populate' the values in the array. I then moved my array to underneath my 'image library' in my preload function! This totally worked! I was seeing all of my clothes!
The next step was to "set up a function which would take the direction of the arrow to influence the value of each clothing". I typed out these functions underneath where I defined 'current_shirt' and 'current_bottom'.
// set up a function which takes direction of clicks to influence the value of shirt

function shirtChangeL(){
current_shirt = (current_shirt - 1) % 3;
}
function shirtChangeR(){
current_shirt = (current_shirt + 1) % 3;
}
The way that I set up the shirtChangeL and bottomChangeL functions would cause me a bit of trouble down the line, I'll get to that a little bit later!
My last step was to utilize a mousePressed function to create a bounding box that would reference my shirtChange and bottomChange functions! Each bounding box correlated to the placement of the arrows on the screen.
function mousePressed () {
   if (mouseX > 35 && mouseX < 97 && mouseY > 148 && mouseY < 199){
     shirtChangeL ();
    }
This image below shows a representation of the bounding boxes that I defined.
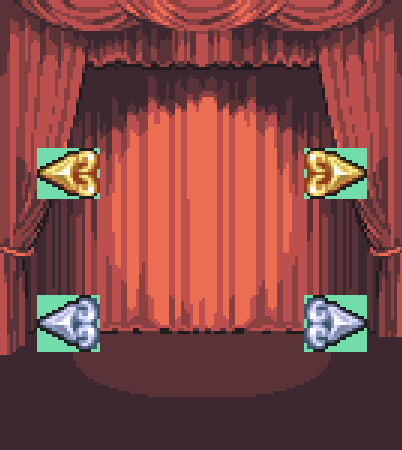
image description: A representation of how bounding boxed were defined in my code. The background of this image features the same stage and curtain image. In the foreground are arrows used to cycle through clothing options. Each arrow has a green box behind it, which are meant to represent bounding boxes. Each box is the exact width and height of each arrow.
I was able to cycle through the various clothing options using the right arrows, but I was only able to do so once using the left arrows. It was because my code didn't anticipate negative values! The function that I established for the left arrows would continue to subtract from the 'current_shirt' and 'current_bottom'!
I corrected the left functions accordingly:
function shirtChangeL(){
current_shirt = (current_shirt - 1 + 3) % 3;
}
nice nice nice nice nice nice nic niec niencienciencienceinecie !!! The code was now working as I had intended!!! nice nice nicenicenecncenienicnicniecniecnicenieniecnenieinenie
I am still in the process of understanding the appropriate order of functions! This was something that affected my last assignment as well. I'm really happy to have a better understanding of Javascript with each discovery I make with my peers!
Comments